California’s outdoor culture is unmatched—from the concrete parks of San Diego to the dirt trails of NorCal—so it’s no surprise that riders here demand equipment that can handle serious abuse. But with so many options on the market, finding the best professional BMX bike CA riders actually trust isn’t as simple as picking the flashiest frame. The reality is that a pro-level bike is an investment in your safety, performance, and long-term progression. The wrong geometry or a weak drivetrain can hold you back, or worse, leave you stranded mid-session. This guide breaks down exactly what matters—from frame materials to geometry ratios—so you can make a confident choice and spend more time riding.
Key Takeaways
- Pro-level BMX bikes prioritize lightweight chromoly frames and precise geometry over budget-friendly hi-ten steel components.
- Your discipline (park, street, or dirt) dictates the ideal top tube length, chainstay length, and head tube angle—there is no “one size fits all” pro bike.
- Full chromoly construction and sealed bearings are non-negotiable quality markers for professional durability and low maintenance.
- Always verify the actual assembled weight and warranty terms before purchasing, as marketing imagery often hides heavier, lower-spec parts.
Why “Professional” Means More Than Just Price
When riders search for the best professional BMX bike CA has to offer, they often assume the most expensive model is automatically the best. That is a costly mistake. A professional BMX bike is defined by its components, material integrity, and how those parts perform under repetitive high-impact stress. Unlike entry-level bikes that use heavy hi-ten steel, pro-level frames are typically constructed from heat-treated chromoly (4130). This material offers a superior strength-to-weight ratio, meaning you get a frame that absorbs impact without weighing you down during aerial maneuvers. Additionally, professional bikes feature sealed bearings in the hubs, bottom bracket, and headset. Sealed bearings prevent dirt and moisture from California’s dry, dusty trails or coastal humidity from grinding your ride to a halt. This isn’t about luxury; it’s about reliability when you are pushing your limits.
Frame Material: Chromoly vs. Hi-Ten Steel
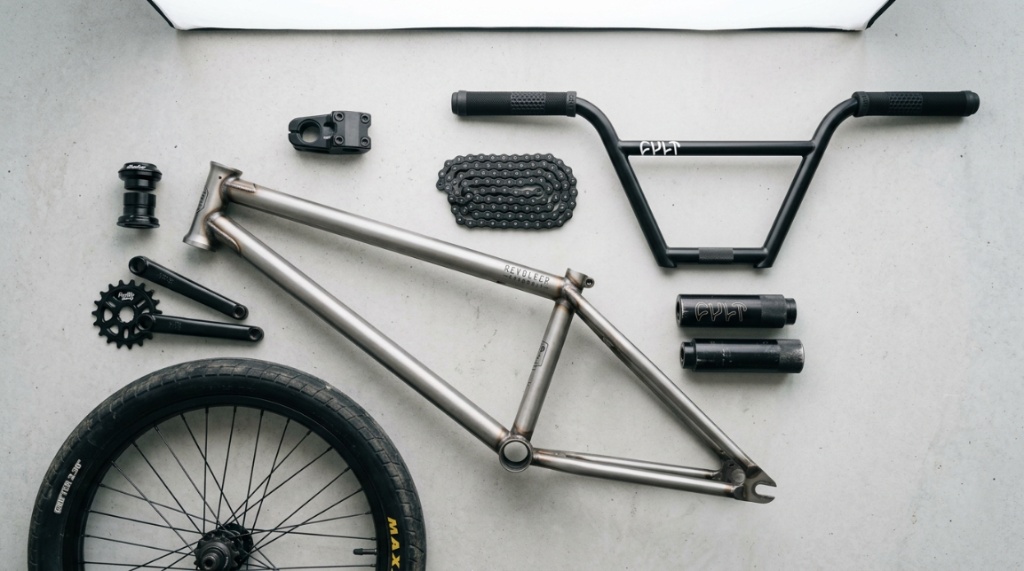
The frame is the heart of the bike. If you want a ride that feels responsive and survives years of abuse, you need to understand material differences. Entry-level BMX bikes use hi-ten steel, which is heavy and prone to bending under hard landings. Professional builds use 4130 chromoly. The “4130” refers to the specific alloy of chromium and molybdenum, which increases tensile strength without adding bulk.
Full Chromoly vs. Mainframe Only
Some mid-range bikes advertise “chromoly” but only use it in the main triangle (top tube, down tube, and seat tube). The rear stays (chainstays and seatstays) might still be hi-ten steel. For a true professional BMX bike, look for “full chromoly” or “100% chromoly” construction. The rear end of the bike takes massive stress during landings and manual tricks, so a full chromoly frame prevents cracking where you least expect it. Even though two bikes look similar at a glance, the ride feel differs drastically—full chromoly tracks straighter at speed and doesn’t flex as much when you’re cranking hard out of a corner.
Geometry: Matching the Bike to Your Discipline
Geometry is the most overlooked factor when picking a professional bike. It determines how the bike handles, how fast it turns, and how stable it feels in the air. Riders in California often switch between skateparks, street spots, and dirt jumps. Choosing a frame geometry suited to your primary discipline is crucial because you cannot simply change geometry with new parts later.
Top Tube Length and Your Height
The top tube length is the most critical sizing metric. It’s measured from the center of the head tube to the center of the seat post. A rider who is 5’6″ should typically look for a 20.5″ to 20.75″ top tube, while a 6’0″ rider will feel cramped on anything under 21″. A top tube that is too short makes the bike twitchy and causes your knees to hit the bars; one that is too long makes it hard to pull the front wheel up. When you find the best professional BMX bike for your body type, you should feel a slight bend in your elbows when standing on the pedals, and your knees should clear the bars comfortably.
Chainstay Length and Stability
Chainstays are the tubes running from the bottom bracket to the rear dropouts. For street and park riding, shorter chainstays (around 13.25″ to 13.5″) make the bike easier to spin and whip. For dirt jumping, a slightly longer chainstay (13.75″ or more) adds stability at high speeds and during long jumps. If you ride everything, consider a “middle ground” chainstay length like 13.6″. It is long enough to feel stable on trails but short enough to throw around a bowl without extra effort.
The Drivetrain: Gearing and Cranks
A professional BMX bike uses a specific gearing standard, typically 25/9 (25 teeth on the sprocket, 9 teeth on the driver). This setup is the industry standard for pro riders because it provides a balance between acceleration and top-end speed. It allows you to spin up to speed quickly for a jump while maintaining enough momentum to clear long gaps.
Beyond gearing, pay close attention to the crank arms. The cranks take a massive beating. On pro bikes, look for 3-piece cranks (typically made of chromoly or aluminum) rather than 2-piece “power spline” cranks found on cheaper complete bikes. Three-piece cranks are stronger and easier to service. Also, check the spindle length—19mm chromoly spindles are the standard for professional street and park riding, offering increased strength over the older 8-spline square taper designs.
Wheels and Tires: Rotating Weight Matters
Wheels are the heaviest rotating part of the bike. Reducing rotational weight makes the bike feel livelier and easier to accelerate. Professional bikes usually feature double-wall rims—these are stiffer and less likely to dent than single-wall rims when you land awkwardly.
You also want to check the tire width. A standard professional setup is 2.3″ to 2.4″ tires. Wider tires offer more grip and a softer landing feel, but they are heavier. If you are riding street and need to slide on ledges, a tread pattern with smaller, spaced-out knobs is ideal. For park riding, a slicker center tread rolls faster on smooth concrete. Ensure the tires are wire-bead or Kevlar-bead; Kevlar is lighter and foldable, but wire beads are perfectly fine for heavy street abuse as they are less expensive to replace.
Brakes: To Run or Not to Run
Brake setups often confuse new riders looking for a professional build. Many street and park pros remove their rear brakes entirely to prevent them from catching on railings and to allow for barspins (rotating the bars 360 degrees). However, running brakes does not make a bike less “professional.”
If you plan to ride dirt or ride in traffic to get to spots, get a bike with a rear U-brake. Ensure it has a “linear brake” or a gyro system (detangler), which allows the bars to spin without tangling the brake cable. If you are buying a professional bike without brakes, understand that stopping relies entirely on foot-braking (pressing your shoe against the rear tire). This is fine for controlled park riding, but dangerous for downhill trails. It is a preference, but it is a decision you must make before purchasing.
Weight: The Real Impact on Trick Performance
Weight is the final deciding factor for most serious riders. A heavy bike (anything over 27 lbs) feels sluggish and difficult to throw around. But chasing ultra-lightweight bikes (under 22 lbs) can often come at the cost of durability. The best professional BMX bike balances these two extremes.
- Geometry: Choose angles based on your primary spot (park/street/dirt).
- Material: Insist on full chromoly, not just a mainframe.
- Parts: Look for sealed bearings and 3-piece cranks.
- Weight: Aim for a 22–25 lb range for a durable yet agile build.
Common Mistakes to Avoid When Buying
Many buyers make the same mistakes when upgrading to a professional bike. Avoid these pitfalls to ensure you get the ride you want,For riders looking to maximize speed, agility, and trick execution without extra fatigue, upgrading to Lightweight BMX Bikes can drastically improve overall performance on both street and park courses.
Ignoring Head Tube Angle
The head tube angle determines how easy the bike is to steer. A steeper angle (75 degrees) makes the bike turn quicker, which is good for park. A slacker angle (74.5 degrees or less) is more stable at high speed for trails. If you buy a bike with geometry that doesn’t match your terrain, the bike will feel “twitchy” or “safe but boring” no matter how expensive it is.
Prioritizing Color Over Replacement Parts
Custom paint is nice, but you need to check if the bike uses standard-sized parts. Ensure the forks use a 1-1/8″ steerer tube (integrated headset). Verify the rear hub is a 14mm axle (or 3/8″ with the option to upgrade). If you buy a bike with obscure bolt sizes or proprietary components, replacing a bent peg or broken lever becomes a frustrating search for parts. Stick to reputable brands and standard sizing so any local bike shop in CA can help you with replacements.
Frequently Asked Questions
Can a beginner ride a professional BMX bike?
Yes, but it is not recommended. Professional bikes are stiffer and more responsive, which means they amplify your mistakes. If you are a beginner, the aggressive geometry and lack of brakes (on some models) can make learning more difficult. It is better to start on a slightly more forgiving mid-level bike that has a higher top tube and softer handling characteristics.
Are lighter bikes always better for BMX?
Not always. While a lighter bike is easier to flick around, an ultra-light bike might use thinner tubing that can dent easier. A durable build using full chromoly and strong double-wall rims is more important than hitting a specific “light” number. A comfortable weight for professional riding is generally between 23 and 25 pounds.
How long should a professional BMX frame last?
With proper care, a full chromoly frame can last several years of heavy riding. However, if you case hard jumps (hitting the top of the landing), you can stress the frame and cause cracks around the welds. Inspect your frame regularly for hairline cracks, especially around the head tube and chainstays.
What size BMX bike should I get for my height?
For a rider between 5’4″ and 5’8″, a 20.5″ top tube is a common starting point. For riders 5’9″ to 6’0″, a 20.75″ to 21″ is more comfortable. Taller riders (6’1″+) should look for custom frames with 21.25″+ top tubes to avoid knee pain.
Conclusion
Choosing the best professional BMX bike comes down to understanding how materials and geometry align with your riding style. Do not get distracted by heavy graphics or trendy colors. Focus on the frame construction, the sealed bearings, and the gear ratio. Whether you are grinding ledges in Los Angeles or hitting jumps in Sacramento, a bike that is properly sized and built with professional-grade parts will make every session safer and more enjoyable. Take your time, test ride if possible, and invest in a setup that lets you push your limits without compromising durability.